"Don't judge each day by the harvest you reap but by the seeds that you plant."
Robert Louis Stevenson


Friday, September 24, 2010

Raised Beds, Vegetable Garden Progress and some Flowers too! Help with plant name please!

"He who sees things grow from the beginning will have the best view of them."
-Aristotle

A few photos to keep my blog up to date on the progress.  I took these photos on Monday Sept 20th and just got around to posting them.  The lettuces have all sprouted along with the beets, kale and swiss chard.  Green onions are doing great, too.  I should have plenty of goodies for Thanksgiving dinner.

Raised Bed Sept 20th, after only ten days

Beets in the 3rd bed
Mesclun in the 1st bed
Onion Sets planted in the 1st and 2nd bed
Onion Seedlings in small square 4th bed. 

First Fall Iris Bloom

Pink Thumbelina  Zinnia

Pink Mixed Cosmos

Giant Zinnia in Orange

Giant Zinnia in Pink

Orange Zinnia mixed with Yellow Cosmos

Perfect White Zinnia


I have forgotten the name of this plant.  If you know it, please leave me a comment.

Close up of the bloom; reminds me of lilacs which happens to be my favorite flower. 

Monday, September 13, 2010

Winter Garden Beds

We spent this last weekend planting the raised beds with goodies for a winter garden.  We added more compost to each of the three long raised beds and also made a small square just for onion seedlings. I don't know what possessed me to buy a pony pack of onion seedlings because it took a lot of patience and time to pull them apart to plant.  By the time I planted ten of the sections with these seedlings I could hardly get up off the ground!  I ended up putting in a few clumps because I was just too tired to separate the remaining seedling.  I might go back down this evening and finish. 

I also put in over a hundred onion sets which should be ready in a month.  The seedlings will probably take three months since they are so tiny. It was a beautiful, peaceful evening last night when I planted them so it was worth the time spent.  I planted these seeds from Botanical Interest Seeds which I purchased at a local nursery. 

Arugula (Rocket and Wild)
Beets (Gourmet and Early Wonder)
Cilantro
Kale (Red Winter and Italian Nero Toscana)
Mache (corn salad)
Mesclun Salad Mix (Farmers Market Blend and Gourmet Spicy Mix)
Radicchio (Palla Rossa Ashalim)
Romaine (Parris Island)
Radish (Cherry Belle)
Sorrel (common seed)
Spinach (Bloomdale)
Swiss Chard (Bright Lights, Fordhook Giant and Ruby Red)

These I purchased at Home Depot.  They have a really good selection now and the sets were fresh; I didn't find one in the bag that was dried up. If you wait too long to buy these and plant them you will end up with a bag of dried up sets. I try to keep the bags in a cool place, but with our heat at this time of the year it is tough.  I need to make room in the refrigerator for the remaining sets.
Garlic (from sets)
Shallot (from sets)
Spring Onion (from sets)

Here are my raised beds for this years winter garden.  Not much to look at but in a month they will be green and lush with all sorts of goodies for salads.
The bed is made from the adobe wall we have in our backyard.  Seven years ago when we purchased this house a section of the wall was so worn we took that section down and replaced it with "slump" block.  Many of the old adobe bricks were still in good shape and we have used these around the property for garden beds ever since.  This weekend we dug out all the soil and lined the beds with chicken wire.  Then mixed in compost.  I also added bone meal, blood meal, kelp meal, worm castings and dolomite lime. I use about 1 part each, a little less of the blood meal, then mix and add to the soil when I am mixing in the compost.  If you use a lot of manure you probably would not need the blood meal.  I like the blood meal for this time of the year because it is fast acting and it seems to really help the fast growing lettuces.

These next two are also adobe bricks but are newer.  They are also narrower than the original bricks.  Adobe is getting difficult to find in our area now.  I had heard that the local property where these were being made was sold and is no longer used to make the bricks.


This one is again, the older adobe bricks.  Just pieces that were left over.  These bricks keep the soil warm in the cooler winter months.  We put up a fence of chicken wire just for last night to keep the bunnies out.  This summer we had a ground squirrel in the tomato beds.  I don't know what I can do to keep those guys out once they find the garden.  I will need to call on the hawks and owls to help me out!

We still have two Green Zebra Tomatoes that I grew from seed.  They have lots of tomatoes right now and with the heat planned for this week I might be picking some soon.  I also have some late plantings of zucchini (second picture) that are doing really well. 
Green Zebra Tomato (in the red cages)
Old zucchini plant still producing a squash, about two a week now.

I planted these three zucchini in late July from seeds.  I have picked a few, but not sure how well they will do with the cooler nights we are having already.  Saturday night we had a low of 56 which is cool for this time of year.

Next project will be to tackle the herb garden, again!  A gopher moved in about a month ago.  I did not lose that much but he has made a mess of the place.  He did eat a lot of my marjoram plant's roots but it survived. I may be lining this bed with chicken wire too.  Now that is a job I am not looking forward to.

Wednesday, September 1, 2010

2010 Tomato Review, Pomme d' amour, Apple of Love


Last tomato harvest for this year.

"To everything there is a season, and a time for every purpose under heaven." -Eccleslastes 3:1

I spent much of yesterday removing tomato vines.  No new flowers in the last week or two and the remaining tomatoes on most plants were quite small.  I planted all of these the second week in March so they have been producing for quite some time now. I still have two Green Zebra plants that I had started from seed in late February and they have lots of tomatoes and blossoms on the vines. Hopefully these will give me tomatoes through September and maybe into October with luck.


Here is my review on what I planted.


  • Heirloom Erica d' Australie: Heavy producer, 1-2 pounds. Late season. 90 days. Nice tomato, heavy producer. Repeat next year
  • Heirloom Purple Russian: Heavy producer, purple red tomato. 6 ounce oblong egg shaped fruit. Sweet. 76 days. Repeat next year.
  • Heirloom Debarao Red Plum: red 3-4 oz oval fruit, abundant crop, deep red paste tomato. Excellent flavor. 72 days. Nice tomato, will repeat next year.
  • Heirloom Banana Legs: grew this one in a large clay pot.  Bush style plant. Heavy producer of nice meaty 3 inch long fruit. Much like a paste tomato.  Nice flavor, pretty in salads.  72 days. a repeat for next year.
  • Heirloom Brandywine: Not sure which one this was. Second year I have tried Brandywine and I will not plant again.  Leaves are much like a potato plant, which is fine, but the leaves tend to turn yellow early on this plant as with the one I tried last year. Might be a mineral deficiency. Fruit was small and took 80 or more days. Too many other heirlooms out there that will do much better than this one has for me.
  • Heirloom Yellow Bell: 2" fruit.  Yellow pear shape tomato, very large-much like a small paste tomato.  Meaty, nice flavor.  Grew this one on the ground and let it vine on its own.  Spread about 15 feet around.  Prolific, produces in clusters.  Will repeat if I can find it again.
  • Heirloom Yellow Stuffer: This plant was a volunteer. Coming up on its own from last year. Forgot about it until I began picking and found it to be this one.  Great tomato for stuffing with a rice salad for a light summer lunch or dinner.  Hollow inside, fun to grow.  Will repeat if I can find it or might be back on its own again. 85 days. Love this one.
  • Heirloom Dr. Lyle: Pink beefsteak. 70-80 days. Excellent flavor. For me this one needed the longer growing time. Large fruit, no cracks, but odd shaped. Will repeat this one next year. 
  • Estiva (F1) French Hybrid Salad Tomato: Love this plant! Never stopped producing.  6 to 8 tomatoes clustered like a cherry tomato.  Nice 2 inch round fruit. 70 days or earlier. If you have trouble with tomato plants, give this one a try.  A must have for next year.
  • Heirloom Green Zebra: probably my favorite tomato. So pretty when cut.  Small 1-2 inch tomato, green/yellow in color with stripes. Nice tangy tomato taste. 80 days. This plant takes a long time for the fruit to ripen.  They come early on the vine, be patient. You will be rewarded. A must have for next year.
  • Golden Sweet Hybrid Grape: heavy producer, excellent flavor. Yellow pear or grape shape.  60 days. Repeat next year.
  • Sun Grape Hybrid Red Grape: Heavy producer with excellent flavor. 60 days. Repeat next year.
  • Heirloom Cherokee Purple: Excellent flavor. Beautiful tomato when cut.  Nice variation in color. 80 days.  Needs at least this much time. Repeat next year.
  • Heirloom Pineapple: Another favorite. 70-75 days. Beautiful bi-colored red/yellow/orange striations. Excellent flavor. A must have for next year.
  • Victoria Supreme VFFNA Hybrid: Excellent paste tomato. 70 days. Took cutting of this plant and rooting directly in the ground. Ended up with three more plants. A must have for next year.
  • Heirloom Carbon Black Salad: Beautiful fruit, no cracks. 10-14 oz fruit.  Must have for next year. Will grow this instead of Brandywine. needs at least 76 days.
  • Heirloom German Johnson: Excellent flavor, large fruit. 78-80 days. Good repeat for next year.
  • Early Girl VF: Outstanding, heavy producer of nice small salad size tomatoes.  Always had one to pick on this plant.  65 days. Will plant next year.
In review the, only one I would not repeat is Brandywine. I am delighted with the success I have had this year with my tomatoes.  I failed to have very many cucumbers; as with last year they developed downy mildew early on. I never use sprays or insecticide in my garden but next year I will need to watch for this and probably will spray with a fungicide if it happens again.


"Summer Scallop trio" a Pattypan mix, "Raven" a zucchini, "Ronde de Nice" a round zucchini and "Supersett" yellow crookneck squash were all great producers as usual. I purchased the seeds from Renee's Garden Seeds 


In the next few weeks I will be working on adding a couple more raised beds for my fall/winter garden; that will give me 5 in all. We are expecting some more hot weather so I will plant towards the end of the month.


In review: I need more land!

Thursday, August 19, 2010

Thank you Lemon Verbena Lady!

A big Thank You to Lemon Verbena Lady for sending me the booklet on Herbs.  What a thoughtful and kind person she is.

Have a wonderful day in your herb garden,
Many Thanks,
Carla

Wednesday, August 18, 2010

Handmade Lemon Parsley Pasta Tiles with Fresh Roasted Tomato Sauce, Pasta Recipe

Our weather has finally turned hot; which means I need to use up some of the parsley I have growing before the seed heads shoot up.  Yesterday I decided to make pasta using the fresh leaves.  The results were delicious and oh so impressive!
You really need a pasta machine to make this. I used an Atlas hand crank pasta machine.  If you have strong arms and lots of time you can do this with a rolling pin like the Italian Grandmothers no doubt did for years, and years.

Handmade Lemon Parsley Pasta Tiles

1 Tablespoon lemon zest (packed from about 3 lemons)
2 to 3 Tablespoons lemon juice
14 ounces  (3 1/3 cups) all-purpose flour
7 ounces (1 1/4 cups) semolina
1/4 cup fresh parsley, leaves only all stems removed (if leaves are large, tear into smaller leaves.
5 eggs, lightly beaten
1/2 teaspoon sea salt
2 teaspoons olive oil


Have all ingredients measured and ready to go.  Combine flour and semolina on a large cutting board.  Form a well in the center of the flours and add the eggs, salt, oil and lemon zest and juice. 


1. Begin mixing with a fork using your other hand to support the outer edge of the flour.  Combine until you can no longer use the fork; continue mixing with both hands until all the flour is combined and you have a firm paste.
2. Roll the dough into a ball and knead with the heel of your hand for 5 to 10 minutes or until dough is smooth.  It will be very firm.
3. Place the dough in a bowl, cover with plastic wrap and refrigerate for at least 1 hour.
4. Place 2 three foot lengths of wax paper on your counter.  You will use these later.
5. Remove your dough from the refrigerator and let rest for 20 to 30 minutes.  Cut the dough into 4 sections.  Keep the other sections covered with the plastic wrap to avoid drying out. 

Beginning with one section of dough, flatten out and begin running through the pasta machine.  You will start with the #1 setting and work up to the #3 setting.  Don't be discouraged if your pasta falls apart on #1,  just fold it and run through again.  You may need to do this 3 or 4 times before it comes out smooth.  Then advance to the next setting. 


"Don't be concerned if your pasta looks like this the first time it goes through the machine, just fold it and run it through again.  I think this section of my dough was still too cold."

6. At setting #3 you will need to cut your sheet in half and work with one at a time. Place the other sheet on the wax paper, cover with a damp towel to keep from drying out.  Continue, running the pasta through the machine one time for each setting working up to the #5 setting.  Now lay your pasta on the wax paper and continue with the other sheet as with the first, working up to the #5 setting.  Lay this sheet along side of your other sheet. 


7. Place the parsley leaves on one of the pasta sheets, trying to keep them separate from each other as best you can.  If the leaves are large, tear them apart to make smaller leaves. 

Now lay the second sheet of pasta on top of the parsley sheet.  Press gently to remove any air.  If the sheets are long, cut in half again so it will be easier to handle.


8. Now run this sheet through the pasta machine again at the#3 setting, #4 setting, then on to the #5 setting. 

Lay this sheet back on the wax paper and continue with your second sheet in the same way.  Your pasta is now ready to cut into squares and cook.


The parsley leaves will break apart when rolled through the machine. Now you are ready to cut your pasta into squares.
At this stage you can place your pasta squares in zip lock bags and freeze for later use. I put wax paper between each row of squares to keep them from sticking together and this also makes it easier to remove a single serving if you are cooking for one or two.

9. In a stock pot bring a large amount of water to a full boil.  Add the pasta squares and cook for 1 minute; because this is fresh pasta it will not take any longer than that.  Drain, serve with a fresh roasted ring a tomato sauce and freshly grated Parmesan cheese.


This day I also made "Pasta Tiles" with fresh Sage leaves and served it with Sage Browned Butter.  No cheese required!

Purple Variegated Sage leaves
My husband loved these.  The slight lemon taste was perfect with the sage and the butter.

To make the Sage in Brown Butter:  Cook your pasta in boiling water, drain.  Place a few tablespoons of butter in a skillet, heat until milk solids begin to turn brown.  Watch closely as you do not want this to burn.  When browned to your liking, add a tablespoon of fresh minced sage, then add the sage pasta.  Cook one minute basting with the browned butter.  Serve immediately.

Alternate Method for Pasta Making:
If you do not own a pasta machine or maybe you don't have the time to make your own pasta, you can use Won Ton Wrappers or Spring Roll Wrappers from the supermarket.  Just place your herb leaves on one won ton wrapper, cover with another then roll with a rolling pin to secure and cook in the same manner as fresh pasta above.


Thursday, August 12, 2010

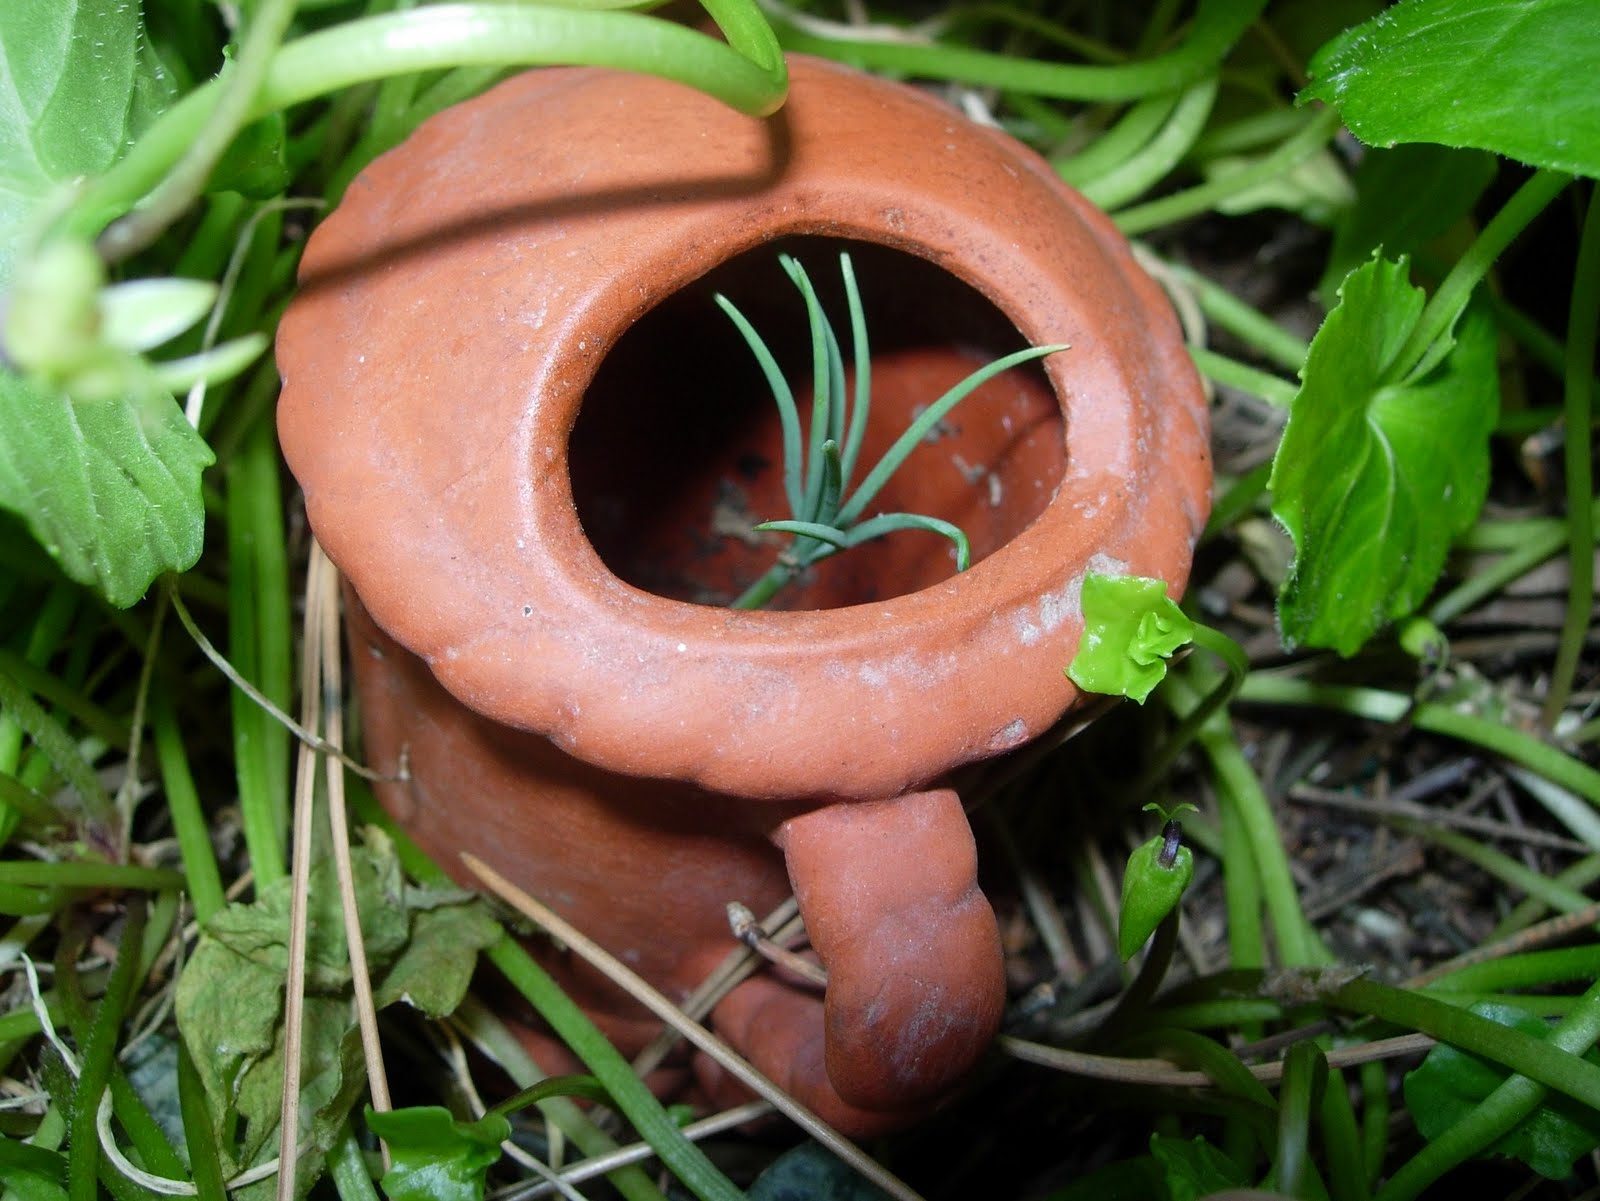
What are the chances......


look closely for the clue...


Of finding...


this small clay pot...


 when falling...


from high in a tree.....


landing right inside.....


and sprouting.....a new life


I am a Pine Tree, no more than one inch high! 


And this...
Is my Mother!!!


I think that I shall never see

A poem lovely as a tree.

A tree whose hungry mouth is prest

Against the earth's sweet flowing breast;

A tree that looks at God all day

And lifts her leafy arms to pray;

A tree that may in Summer wear

A nest of robins in her hair;

Upon whose bosom snow has lain;

Who intimately lives with rain.

Poems are made by fools like me,

But only God can make a tree.

~Joyce Kilmer, "Trees," 1914


Wednesday, August 4, 2010

A Well Organized Pantry and Appaloosa Beans


My kitchen cabinets are 1970's wood, very small with limited storage.  I do however have this one nice large pantry which holds all of our food products, storage bowls, glass mixing bowls and bakeware. 


I spent yesterday adding more jars of beans.  Earlier last week I ordered some from Purcell Mountain Farms and they arrived yesterday. 


I am cooking some of their Appaloosa Beans now with some chicken sausages from Trader Joe's.  I think that will be a yummy dinner for tonight with some cornbread.  I also purchased Anasazi, Pinto, Cannellini, Cranberry, Black Turtle, Red Chief Lentils and Split Green Peas. 

I love that so many of these beans are named after horse breeds.  Maybe we should dress for dinner, cowboy hats and boots?


I thought I would share my small, but I think, well organized pantry with you.  I am attempting to eliminate most, if not all of the plastic containers I use for storing.  I have a large amount of canning jars and I also save nice jars from foods I buy.  The Ball Wide Mouth  jars work out well for the beans and all sorts of dry goods.  You can find these jars at thrift stores also. 

"To invite a person into your house is to take charge of his happiness for as long as he is under your roof."

_Anthelme Brillat-Savarin


Sunday, August 1, 2010

BASIL, BASIL EVERYWHERE! It's PESTO TIME!

"To have nothing but Sweet Herbs, and those only choice ones too, and every kind its bed by itself." 
-Desiderius Erasmus
Basil in early June 2010

I planted so much basil this year and I am being rewarded with plenty to make my own pesto.  I store this in small jars that I have recycled.  You can freeze it at this point, but be sure to use freezer safe glass or plastic containers.  You can purchase freezer safe  jars at many supermarkets.


Here is the recipe I have used for many years.  Not sure where I found it, but it is perfect every time.  I added the addition of Lemon zest because I like the flavor and also this will keep your basil green.

Basil Pesto Sauce

4 cups tightly packed fresh Basil  leaves (all stems removed)
1/2 cup Extra Virgin Olive Oil
2 Garlic cloves, crushed
1/2 teaspoon fresh Lemon Zest
6 sprigs fresh Parsley, (leaves only stems removed)
Sea Salt and ground Pepper to taste
1/4 cup Pine Nuts, Walnuts, or Almonds
1/2 cup freshly grated Parmesan or Romano Cheese


Wash the Parsley and Basil leaves in cool water, spin until very dry in a salad spinner or use paper towels.  Place leaves in a food processor.  Add Oil, Garlic, Lemon Zest, Sea Salt, Pepper, and Nuts.  Pulse blend until all is chopped, stopping to scrape down sides.  Add the grated Parmesan and give a few quick pulses to blend.  Refrigerate in airtight container.  Makes about 1 1/2 to 2 cups of pesto.

( From the seeds planted in May) Washed Basil Leaves
Leaves Dried in Salad Spinner
Have your ingredients ready to go
Pesto should look like this when processed
small amount of oil will remain on top
Ready for refrigerator or freezer