"Don't judge each day by the harvest you reap but by the seeds that you plant."
Robert Louis Stevenson


Showing posts with label Painting Kitchen Cabinets. Show all posts

Wednesday, September 18, 2013

Kitchen Remodel Update, Finally!!


Many months have passed since I finished the kitchen, I just never took the few minutes to load the photos to the blog.  The summer kept me busy with a few projects, one being the Thrift Store Cabinet that went through a few changes before I finally converted it to open shelving and a wood top.  Originally I wanted to keep the two side doors and at least one of the drawers, but after sanding and painting they just didn't fit right. I don't think they ever did but I just didn't notice when we bought the piece.  The drawers wobbled when you opened and closed them.  They were not designed to hold a lot of weight and with the sliders that were on them they fell forward when open. The finished unit is working out really well for all of the produce.

Click on any of the pictures to enlarge them


We are still going to put wood shelves on the bottom section, the wood is very nice and I think having that on the bottom will make it have a nice finished look.  If you know me at all you know I always have some sort of project waiting to begin or finish; probably the reason the kitchen took me so long in the first place.  I really enjoy projects! 

Now for some photos. If you would like to check out my first blog entry at the beginning of this project, click HERE


The kitchen measures 20 feet from the refrigerator to the wall the hutch is on and from the sliding glass door to the wall by the thrift store cabinet measures 13 feet. It is a nice, large space now that it is all opened up.


This photo shows the thrift store cabinet and rolling island.  This summer the top was covered with tomatoes from my garden; that was the main reason I wanted this long cabinet.  The cabinet looks smaller than it's length of just over 7 feet. It is 20 inches deep and 36 inches high.  The rolling island is 48 x 24 inches on top and 37 inches high.  I have so much counter top space now!


Right now the two lower shelves are used for onion, sweet potatoes, potatoes, citrus and hard squash.  Of course this will change with the season.  Our citrus will start coming in some time in November and go until June if we are lucky.  When they really start to produce the top counter will be used for citrus and I will hopefully have shelves above this cabinet to holds the jars of dry grains, beans, etc.


The granite counter measures 13 feet from one end to just past the sink.


The island that originally was stationary and used where the thrift store cabinet is now, was re-purposed with industrial  casters and moves about the kitchen freely.  It also has a cabinet on the one side that I use to store flours.

If you follow my blog you will know that this area originally had a round table that had a few color changes, three to be exact. Once I had the thrift store cabinet in place I decided I didn't need the 48" table in this area any longer. I always used it for tomato time, but since have moved it to the dining room and donated my really long dining room table with eight chairs to the thrift store. We just don't need it any longer.  

I painted (of course) this little garden table the same color as my cabinets and it is working out perfect for Tony and I do dine at. I love to sit here, planning my garden day and having my breakfast. It is also a special spot to have tea in the afternoon.  Did you notice the donkey and Mexican man along the wall/floor,  I found it at a local antique store and repainted it.


I am cooking up a storm and enjoying my "new kitchen" even though it is not what a lot of people would think is a remodel, if you look at what we had and what we have now, I think you will agree that it is a "new" space.


Wednesday, April 24, 2013

Kitchen Remodel Update, Painted Chairs, Thrift Store Cabinet


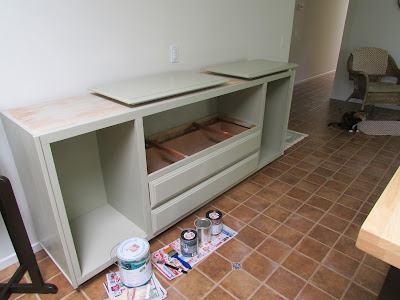
 Here is the dresser I bought at a thrift store for $40.00.  I removed the four long drawers in the front and also the doors. I first painted the drawers and doors along with the cabinet itself in the sage green color, but since have decided to leave the drawers out and keep the doors off.  I removed the upper and lower braces from the drawers and will put in 2 pine shelves.  I also cut two pine boards for the cabinet sides to use as shelves.  The top will have a nice pine plank top. 

It originally had four drawers. I was going to keep two for linens, but they were not very secure so out they came. I removed all but one of the braces. The photo below shows one on the bottom half which I have since removed.  The shelf will sit on the center one.


the photo below shoes the cabinet with two drawers still in, but these have since been removed and the shelves added.


I painted the old green chairs this color. I used Behr's Chipotle Pepper then antiqued them with the custom Poblano Pepper color I had them mix up for me.  That is the color I painted the island. The white table in the picture is one that I painted last fall and now I am going to paint it again! I will use the same chipotle and poblano colors I used on the chairs, but may make it a bit more of the poblano color just to mix it up a bit. 


I also found this fabric that I will use for the glass door drapery and may also use it on the kitchen (sink) window. I want to get a nice textured blind for that window so I may just make a valance out of this fabric or may use it with the stripe fabric that is on the chairs. 


Monday, March 25, 2013

My Never Ending Kitchen Project


Have I told you how much I love to paint?


Last week I painted this ROLLING ISLAND.  This is a custom color that I had Home Depot (Behr paint) make for me.  I took in a Pasilla Chili pepper for them to scan.  Look how beautiful this color is, it is a red chocolate brown and looks really nice with the floor.  The light was coming in strong from the skylight this morning when I took these photos, so everything is bathed in sunlight and appears lighter than the rich color and is not picking up the red/purple tone.  My granite counter-top has a dark amethyst stone in it and is the same color as this island.   


In this photo you can see my white table and a green chair, I will repaint my table CHIPOTLE PASTE (from Behr Paint) and then I will paint the two green chairs the same color as the island.

The fabric below is one I found at an estate sale for $2.00, I think it is about 6 yards.  It is designer fabric that is very good quality and will look really nice once I cover the cushions on the chairs.  The reddish stripe is very much the same as the Chipotle Paste paint color. All this pepper talk is making me hungry for MEXICAN FOOD!


Monday, November 19, 2012

All Smiles Today!


I am so happy with the way my kitchen is turning out!

I finished all the painting last week, and Tony helped me Saturday and Sunday putting all the doors and all the hardware on the cabinets.


It took a long time because the paint added a bit more thickness to the edges of the doors which caused the existing holes for the hinges to be a bit off on a couple of the doors.  Also I never noticed before when they were wood that they didn't all line up perfectly! It showed up when they were painted, all in all I am very pleased with the results.


We ended up choosing black hardware over the brushed nickel.  When I tried the hinges on the nickel, they didn't line up on most of the doors.  Not sure why because the style was the same as the black.  Things work out for the best and now that the black is on all the cabinets, I like it better than the nickel anyway.


We still have to patch the walls from the electrical work, affix the cabinet to the wall before the counter top and new sink goes in.  I also am thinking about painting the island cart the same color as the cabinets. 


We still are looking at samples for the counter top.  Tony likes the granite called Typhoon Bordeaux. The sample looks nothing like the slab we saw at Arizona Tile, but then the variation in the grain and color is different in each slab. The one we looked at had a lot of the sage green color and was much lighter than this small sample.  The brown tile in the photo is what will go on the floor and the small tiles are for the back of the stove area and under that cabinet.


So far my costs have only been for the paint; 1 gallon of Behr Semi-Gloss color is Bonsai Pot. The color will not come up on their website, but they have the swatch in Home Depot.  Then 1 gallon of Kiln primer.  I have 1/2 gallon of each left!  Cost for the paint was $39.98 and the primer was around $20.00.  The hardware (hinges and handles) came in around $140.00.  

Of course the counter top and tile installation will be $1500.00 - $2200.00.  I still need to buy the stainless steel sink, but I think I will come in close to my budget of $2500.00 for the whole project.  

Below are some before photos:


September 17, 2012


Wednesday, November 14, 2012

Making Progress

CLICK ON PHOTO TO ENLARGE

First coat of Semi-gloss Enamel on lower cabinets.


Drawers with First Coat


I added some (wood) trim to both sides of the cabinet.


This photo shows the trim I added to the center, where both cabinets meet and to the right edge.  There was a bit of a gap in the center and I think the added (wood) trim makes the cabinets have a more finished look. 


More trim on both sides of the dishwasher.


Above photo shows the cabinet frames with just the primer on them. I will paint those tomorrow with the Semi-Gloss.


This is the area under the sink.  It turned out nice and smooth. I will give most of these a second coat, I think, not sure if I need to do all the framing with a second coat but I think the drawer fronts and doors will hold up better with two coats. 


I added a wood corner trim piece here.  I really like the way this added trim is looking, my cabinets look much cleaner and finished now. 


Today, I paint the 16 doors, one side only! This photo shows them with the primer. This will be a two day project since the enamel takes a lot longer to dry.  I can't paint both sides the same day.


Another photo of the frames with just the primer. Hopefully I can get the doors and frames finished today.  I am waiting for the air to warm a little more outdoors so I can open up the windows.  


 Sorry for the blurred photo here, just wanted a picture of the doors.


Below are some photos of two Granite samples.  I am leaning towards the darker color since my floors with be the brown tile (see photos from previous posts) and I like a earthy color scheme in my home. I like the clean, white color of the Kashmir White, but I think it would be a little too Modern for what I am looking to achieve.  This weekend we will go to Arizona Tile and look at more Granite samples.  I am also thinking of adding tile to the back of the stove area and under those cabinets, then run it along the back-splash by the sink and that counter. Lots to think about! 


Often the goal is nearer than

it seems to a faint faltering man,

often the struggler has given up

when he might have captured the victor’s cup,

and he learned too late, when the night slipped down,

how close he was to the golden crown.

-Author Unkown

 More Inspiration Below


Wednesday, November 7, 2012

Painting, Painting, Painting

We finally finished all the sanding.  I painted the insides of the cabinets a bright white enamel; took two days.  Today I begin painting the frames with the primer and then on to the drawers and doors.

I am a little behind my schedule because I kept changing my mind on the cabinet color.  I finally stayed with a sage green color but chose another one.  I am using Behr paint color "Bonsai Pot".  It is a pretty sage green with a bit more blue in it. The color does not come up on their website, but once I get the frame done and a few drawer fronts I will post a photo of it.

For now here are a few pics of the inside of the cabinets and the mess I have in the kitchen.  I have 16 doors to do, both sides, and 8 drawer fronts.

I feel good today and ready to Move Forward, if I may use a line from our President. I am delighted that he was re-elected!


"Life is not just waking up one morning and saying ok I want this to happen,
it's about getting out there and going for it."
-Helen Grandison